

Note: the concepts explored in this post can potentially cause data loss or other issues if not implemented properly. Any customizations should be well tested in a development system before reaching your production environment. But you knew that already, right?
When our organization started rolling out Aptify Web to end users, we quickly ran into issues with users complaining of either missing functionality, or behavior differences between Desktop¹ and Web.
We could have certainly shrugged or told our staff to suck it up², but that’s not really in our DNA. The development team’s motto in situations like these is pretty simple: Find A Way™️.
We also knew that as the opening salvo in our Aptify Web move, a few improvements for end users would go a long way to building shared trust and confidence as we continued the transition.
Luckily, Aptify Web is piles and piles (and piles!) of JavaScript. This is a beast we can tame.
A Better Prompted View
To begin our journey into becoming Aptify Web hacking ninjas, I’m going to discuss in detail one of the first hacks we made on Web.
Staff in our member services department had a very popular, oft-used prompted view for searching for members using either Name or ID. While this prompted view worked well in Aptify Desktop, the prompting behaviors of Web made it less-than-ideal.
The view in question was designed to take advantage of the fact that under Desktop, each invocation of the prompt filters is effectively a blank slate: the fields reset back to their default values, ready for staff to start over with a new query. Web offers no such reset super power.
Web also introduced what we considered to be a rather annoying “feature” in that the default text filled into each field was not selected when a user focused into the fields. This required the user to manually make these selections to replace the default value. Do this a few times a day? No big deal. Do it dozens and dozens and dozens a times a day… death by a thousand paper-cuts.
Finally, pressing enter in a prompt input field didn’t execute the view query, which again seemed odd and made the entire experience feel just a little bit broken.
We had a mission: solve these problems, solve them quickly, and solve them in a way that worked for every prompted view. Mission: Impossible? Let’s find out.
Finding a Foothold

The first step to doing any Aptify Web hack is to determine where we can augment Aptify Web’s JavaScript code with our own custom logic. This requires three things: (1) some basic skills with Javascript and a JavaScript debugger, (2) some patience and (3) a little luck.
For my examples, I’ll be referencing the Chrome DevTools. While I personally think they are the most approachable for this kind of work, you certainly can use whatever JavaScript debugger you are comfortable with (so long as you are in a modern, well supported browser³…)
The first thing I did when I began working on the prompted view issues was to step through the JavaScript that is run when loading a view in Web.

One way to do this is to set the debugger to break whenever you click in the interface using an Event Listener Breakpoint. Turn this on just before you click on a view in the interface, and you’ll be off to the races.
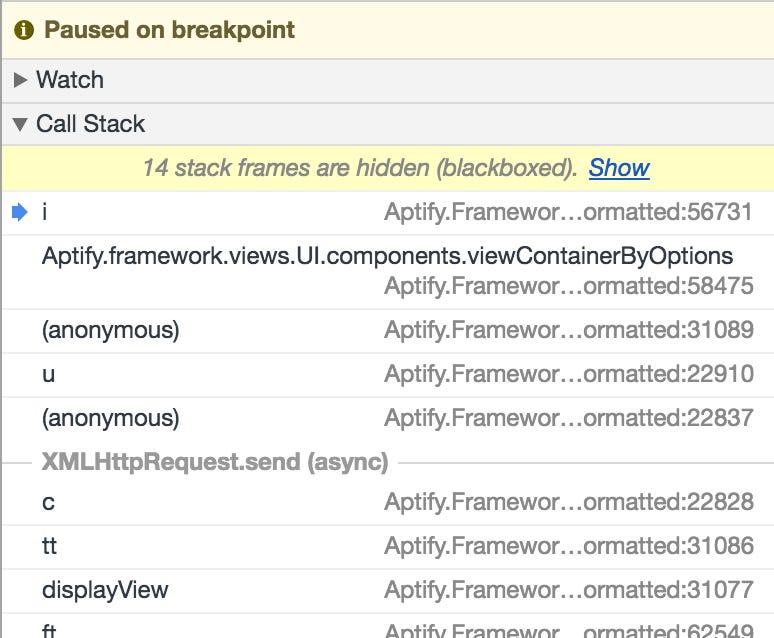
Once you start debugging, you’ll start to quickly notice a rather annoying problem… you’ll not only step through Aptify framework code, but also jQuery, Kendo and other libraries that Aptify Web are built on top of.
Luckily, the DevTools has a rather elegant solution: blackboxing. Right click on a source file in the debugger, and you’ll find an option to black box the script.
Now that we can focus on Aptify specific code, we can start to identify the methods that are used to complete the view loading task. The challenge now is finding methods that occur at the correct moment in time: in the case of the view loading, I need a method that fires after the DOM elements for the view prompts have been added.
After spending a bit of time stepping through the methods that execute after I see the prompt fields appear, I find a promising method in Aptify’s framework JS: Aptify.framework.views.UI.components.viewContainerByOptions.
Direct Manipulation: Thorns Lie Ahead! Danger, High Voltage! Now Entering The Valley Of Death! (You Get The Idea)

Your first thought at this moment might be “hey, let’s start hacking up Aptify’s JavaScript file!” While this is clearly a form of “hacking”, it’s a pretty scary approach, since we are talking about huge JavaScript files that are minified and aren’t designed for human manipulation.
It’s also almost guaranteed to be overridden on your next upgrade, which means you get to reintegrate your hacks over and over again (that sounds fun!)
This is where we “luck out”. Since we’ve found a public method on the Aptify window object, we have a much more elegant approach, that while not completely upgrade-proof, has a far greater chance of having a long(er) lifespan (I’ll get into more upgrade-related considerations later).
Our Very Own viewContainerByOptions
Because functions in JavaScript are first-class objects, we can easily reference and call them in our own code. This means we can effectively replace Aptify Web’s public methods without ever actually touching the base product code.
To begin, we need to grab a reference to Aptify’s version of viewContainerByOptions. We do that by just storing it into a variable:
var orgViewContainerByOptions =
  Aptify.framework.views.UI.components.viewContainerByOptions;
Now that we have a reference, the magic happens: we can replace Aptify’s version of this method with whatever custom code we dream up, and then can call Aptify’s version to complete the standard out-of-the-box work.
Aptify.framework.views.UI.components.viewContainerByOptions = function (d) {
  CustomViewContainerByOptions(d.domElement, arguments);
};
In this case, I’ve decided to keep most of the actual custom logic tucked away in a separate private method (this is just a personal style decision and not a necessity). What you should note at this moment is what I’m doing with the parameters: my function literal defines a single parameter d. This is done only so I can then pull out the domElement member from this object, which we’ll use later in our custom method. I also pass arguments, which is a special JavaScript keyword that holds an array of all parameters passed into the function when it was invoked.
Now that we are invoking our custom function, let’s start digging into the custom implementation itself:
function CustomViewContainerByOptions(domElement, args) {We begin by calling Aptify’s original version:
orgViewContainerByOptions.apply(Aptify.framework.views.UI.components, args);The apply JavaScript method on the function prototype is very useful for us in this case, because it allows us to appropriately scope the this value (Aptify is expecting this to be the component member). It also allows us to pass in an array of all the arguments that were provided on invocation. This means that even if Aptify adds parameters down the road, our custom version will just keep on chugging along none-the-wiser.
Next, we find the container box that holds all of the prompt fields:
var $prompt = $(domElement).find(".a-entityListView-prompt");The dollar sign on the variable name is a hint to myself that the value stored in this variable is a jQuery wrapped object (just another style choice). The domElement points to the specific view tab container, so we guarentee we won’t accidentally get prompts from another view that might have been loaded in the interface previously.
Now that we have the prompt container, let’s make our first improvement:
var $btns = $prompt.find(".a-prompt-buttons");
//Add enter key support to prompted view fields
$prompt.on("keyup", ".a-prompt-input", function (e) {
  if (e.keyCode === 13) {
    $btns.find("[data-role='a-go']").click();
  }
});
So let’s break down what’s happening here: we start by getting a jQuery object with all the buttons in the prompt container (we’ll be using this in several places throughout our custom method). Then, we use event delegation to add an event that fires every time a key goes up in any of the prompt input fields, and if the key pressed is code 13 (which just so happens to be the enter key), we find the “Go” button and fire its click event. Pretty cool, right?
If you are wondering how I discovered the names for elements (like a-prompt-buttons or a-prompt-input), this is easily accomplished by just poking around in the DOM a bit… just right click on elements and select the “Inspect” option.
We still have two more improvements on our hit list, so let’s knock off the next one:
//If field contains default value, select all on focus
$prompt.on("focus", ".a-prompt-input", function (e) {
  var defaultVal = $(this).closest("div.a-prompt").data("default");
  if (defaultVal == $(this).val()) {
    $(this).select();
  }
});
Here, we are leaning on event delegation again to run some code whenever a field becomes focused. We take advantage of the fact that Aptify stores the default value for the prompt field in a data- attribute to determine if the current value is the default. If it is, we select all the text in the field. Otherwise, we do nothing. We’ve just solved the nagging default selection paper-cut.
Now, let’s really go crazy…
//Add RESET button
$btns.append(
  "<button class='k-button' data-role='a-reset' style='background: rgb(221, 44, 0);'><span>Reset</span></button>"
);
$btns.find("button[data-role='a-reset']").click(function () {
  CustomViewContainerByOptions(domElement, args);
});
So here, we are actually injecting our own UI into Aptify Web and then adding a click hander to effectively reload the view when it’s clicked.

Look ma, a third button on prompted views!
Where Do We Put This?
This hack started it’s life where all of my hacks start life… in the Snippets section of the DevTools. This allows me to write, test and tweak each hack until it’s “perfect”.
So this is great… once we have golden code, we’ll just have staff open up DevTools, paste in code we send them, and execute it every time they launch Aptify Web!
Hmm, on second thought…
We ended up deciding to create a single JavaScript file to house all of our customization hacks, and then modified the Aptify Web index.html to reference it. Because we knew we were going to keep adding more of these hacks, we also set the cache expiration headers on this JavaScript file to expire right away.
Another way to potentially approach this starting with Aptify 5.5.6 is to use client_configurations (our hacking work began before this existed, and we haven’t revisited the subject).
Living Through Upgrades
An obvious criticism of doing customizations of this sort is potential for breakage between upgrades of Aptify. While there is always some potential for issues, the following tips should help mitigate upgrade-related issues:
- Place all your hacks in a single file. This makes it easy to quickly turn them all off to debug/verify compatibility issues.
- Place each hack in a separate method within said file. This makes it easy to turn off individual hacks when needed.
- Use apply and the arguments variable to pass through all parameters.
- Only reference members within parameters when absolutely necessary, since upgrades could potentially see these members changed.
- To be even more safe, check for the existence of Aptify public methods, and skip out entirely if they aren’t available.
Just The Beginning
This article just begins to explore the kinds of hacking and customization that is possible inside Aptify Web. We’ve already added a bunch of additional hacks to our suite, including:
- Better handling of views that error out when loading
- Supporting range selections on view grids using the shift key
- Showing a loading indicator on entity record loads
- Adding expanded keyboard bindings (for example, typing “N P” to create a new person)
- Injecting custom CSS styles
- Augmenting existing tab behaviors (middle click to close and ctrl+click to close all others)
I’ve also been noodling on writing some sort of “PowerToys” for Aptify Web that could be throw up onto GitHub and passed around… but that will have to wait for another day.
Wrapping Up
I hope I’ve convinced you of the tremendious power and flexibility you can bring to bare by leveraging these approaches to augmenting, extending and even introducing entirely new functionality inside Aptify Web. We’ve found it an invaluable way to “bridge the gap” with long time Aptify Desktop users who have certain built up expectations. We are also excited about the long term prospects in using these patterns to make Aptify Web more powerful for our organization.
- I know Aptify Desktop also often goes by another name, but I dislike it, in part because I think both flavors of Aptify are “smart” in different ways (as an aside, they also can both be fairly aloof in other ways).
- Obviously, we’d never say something like this to our users.
- For the love of god, please no Internet Explorer!